This is the blog post that I’ve been excited to write.
I’ve been writing a series about the time tracking platform that I’ve been building over the last two years. In the first post I cover why I’ve been building it, and in the second post you can learn about the specific UX goals I had in the design. You may want to check those posts out if you’re looking for some context on what I’m working on.
But this is the post I’ve been excited to write, and why I started writing in the first place. iOS 14 widgets were an exciting announcement and unexpectedly came in with giant answers to my design goals of:
- Clearly indicate if some timer was running without opening the app
- Avoid notification badge noise
I show the current time in HH:MM:SS format. When a timer is running everything
lights up green and the timer counts up by the second. It’s nice to hit the start
button, see the UI light up, and then see the timer start to roll.
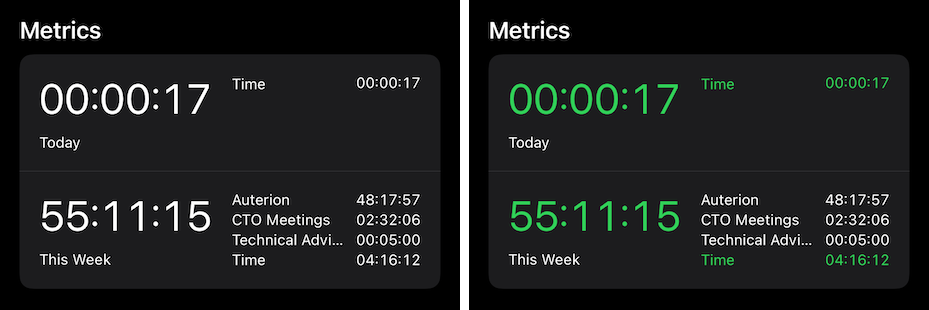
To maintain reasonable performance I’m caching almost all of the data shown on the home screen timer. All closed timers are cached with a final total and are binned per category. I’m also storing a reference to the open timers.
This means the actual calculations to show current time are:
1. Get seconds from start time of open timers to now
2. Add "open" seconds to cached values for total
3. Format totals as HH:MM:SS
4. Update display
This is run with a timer that fires every second. Because all values are calculated based on start time minor slippage in the firing time won’t impact any future values. Each update is unique, and shift isn’t a concern here.
My goal with an initial widget was just to take these totals and put them on a small 2x2 widget on my phone. This would allow me to immediately see if a timer was running and would give me a fast read of the current day’s usage.
It was pretty easy to mock up this in SwiftUI:
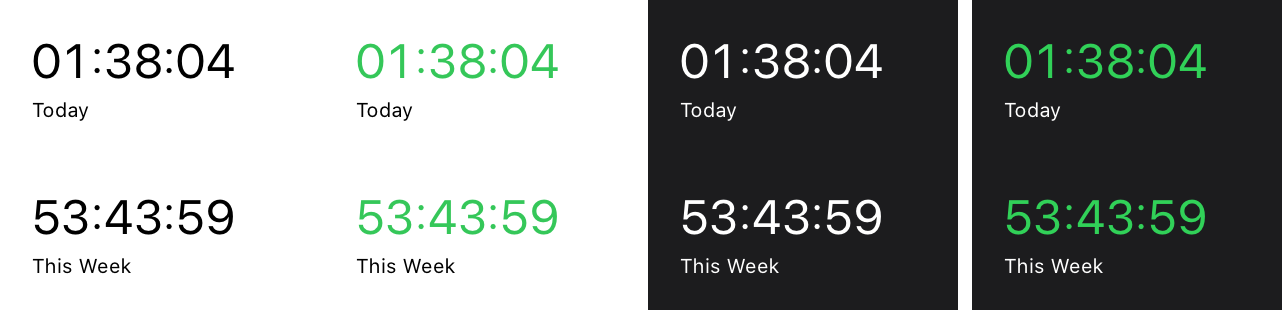
Just like the core interface, my widgets support light and dark modes, and indicate if something is running by turning green.
When building a widget for iOS, developers must provide a timeline of data. This is essentially an array of values with dates. The data is what needs to be shown to the user, and the date is when that data is relevant.
For a weather widget this is easy, and the number of timeline events needed are relatively low. If you are displaying an hourly forecast, all you need is:
1pm: 65 and sunny
2pm: 63 and sunny
3pm: 48 and cloudy
4pm: 35 and rainy
5pm: 28 and snowing
When extending to something like a fitness application it makes less sense to schedule future data and instead show the current value and say how long it is relevant for. This allows for data that is accurate within some range of time, and the OS will schedule hard updates as needed. A hard update actually launches the widget and runs your code.
It’s important to note that each hard update incurs a penalty as does each timeline entry. The OS does not guarantee that something will be shown at a particular time. Widgets that request constant updates will be penalized to balance other system resources and needs.
In my first iteration of live updates, I displayed the current values and scheduled an expiration time based on if a timer was running or not. Running timers had scheduled updates every five minutes and stopped timers had background refreshes every two hours.
This worked, but meant that my data was normally about 5-10 minutes stale. This completely met the immediate UX needs, but wasn’t particularly nice especially when the display directly showed second level precision.
Status: functioning, but with a mismatch in precision
The clear phase 2 of this widget was to improve the update cycle. To see if it would be possible to actually update the widget every second.
Phase 2: Updating it live
First Try: SwiftUI Timer
As a first test, I wanted to see if I could just hook up a timer like I
would do within an app. With over a year since I had watched the WWDC videos on
@State and how SwiftUI worked, I thought a quick search of “how to use a timer
in SwiftUI” would be helpful. It was.
After a quick mockup, it was clear that timers do not fire in the background for widgets. This makes complete sense, but killed the easy option.
SwiftUI Timer: Not viable
Second Try: Lots of Timeline Entries
Switching over to a new option, I scheduled a timeline update for every second and set the timeline refresh for hours in the future.
My goal was to test the accuracy of timeline event updates, and see how the system penalized updates. It’s clear that full timeline updates (when the app actually runs) are penalized, but Apple’s documentation is less clear on how/if a high frequency of timeline entries are handled.
It looked awful.
The updates were close-ish to the second mark, but not nearly close enough to display accurate time. Some gaps were clearly longer than others and it was a much worse experience than just knowing that the data was slightly stale.
A timeline entry every second: Not viable
Third Try: Show Uncertainty
The main problem with per-second precision is that you expect it to be accurate
to, well, the second. To balance this I considered showing the second when a timer
was stopped and showing XX when the timer was running.
I also considered showing precision just to the minute and scheduling an update once a minute instead of once a second. An update to the minute is close enough even with shift in the seconds.
These are two of the tests:
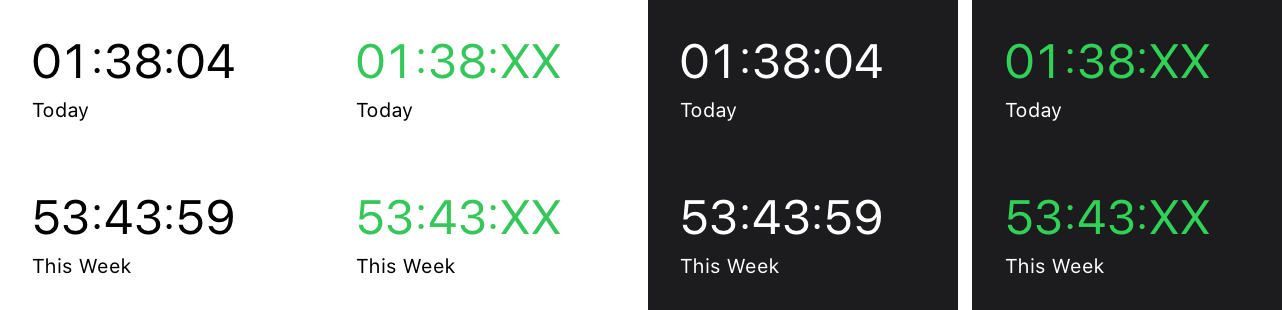
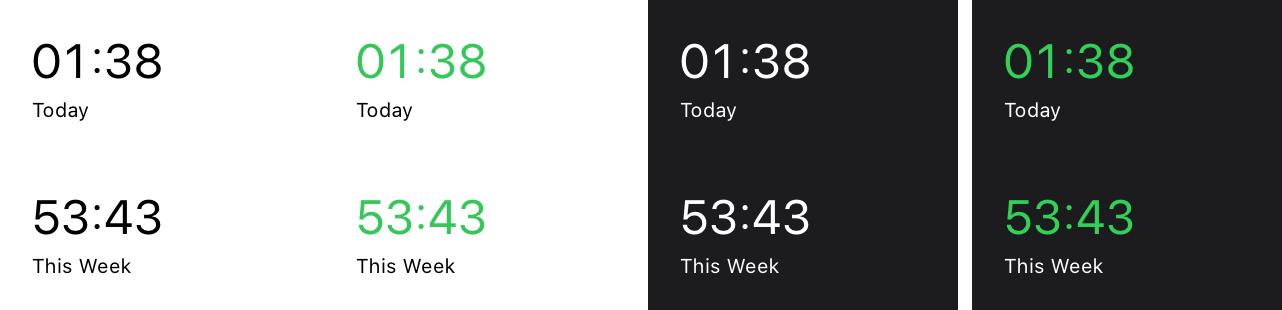
The HH:MM variant is better. It is more accurate to what is known and true,
but it’s really not what I want. The HH:MM:XX is a hard no go. I really did
not like how this option looked either.
Show uncertainty: Viable, but ew
Fourth Try: Text.DateStyle
While looking for other options I came across the init(_ date: Date, style: Text.DateStyle)
API on a SwiftUI Text object.
This API is provided so that widgets can show dates, time since, time until, differences between times and timers. This is essential to build a widget that shows times until meetings, flights, etc. This is exactly what I was looking for.
I quickly found that Text(pastDate, style: .timer) would render HH:MM:SS timers
with the amount of time between that past date and now. This string automatically
updated and could potentially offer what I needed.
The catch here is that times are rendered as 9:15, 10:13, 1:53:52, and
32:13:35. These strings show HH:MM:SS but do not add leading 0s. I’d have
to add the leading zeros myself in display.
A quick thought was to just have 00:00:00 as a text view under the live text
view. This would mean that as the time grew it would overlap the correct values
and fill them in. By matching the background color of the live time to the
background of the widget, I could cover up and hide the unneeded 0s in the
background view.
struct TextWrapper : View {
  var body: some View {
      ZStack(alignment: .trailing) {
        Text("00:00:00")
          .font(Font.system(size: 24.0, weight: .regular, design: .default).monospacedDigit())
        Text(pastDate, style: .timer)
          .font(Font.system(size: 24.0, weight: .regular, design: .default).monospacedDigit())
          .background(Color.red)
      }
  }
}

This was really good. A clean solution that would be easy to maintain and straightforward to reason about.
Popping over to Xcode I tested this same view within a widget and saw:
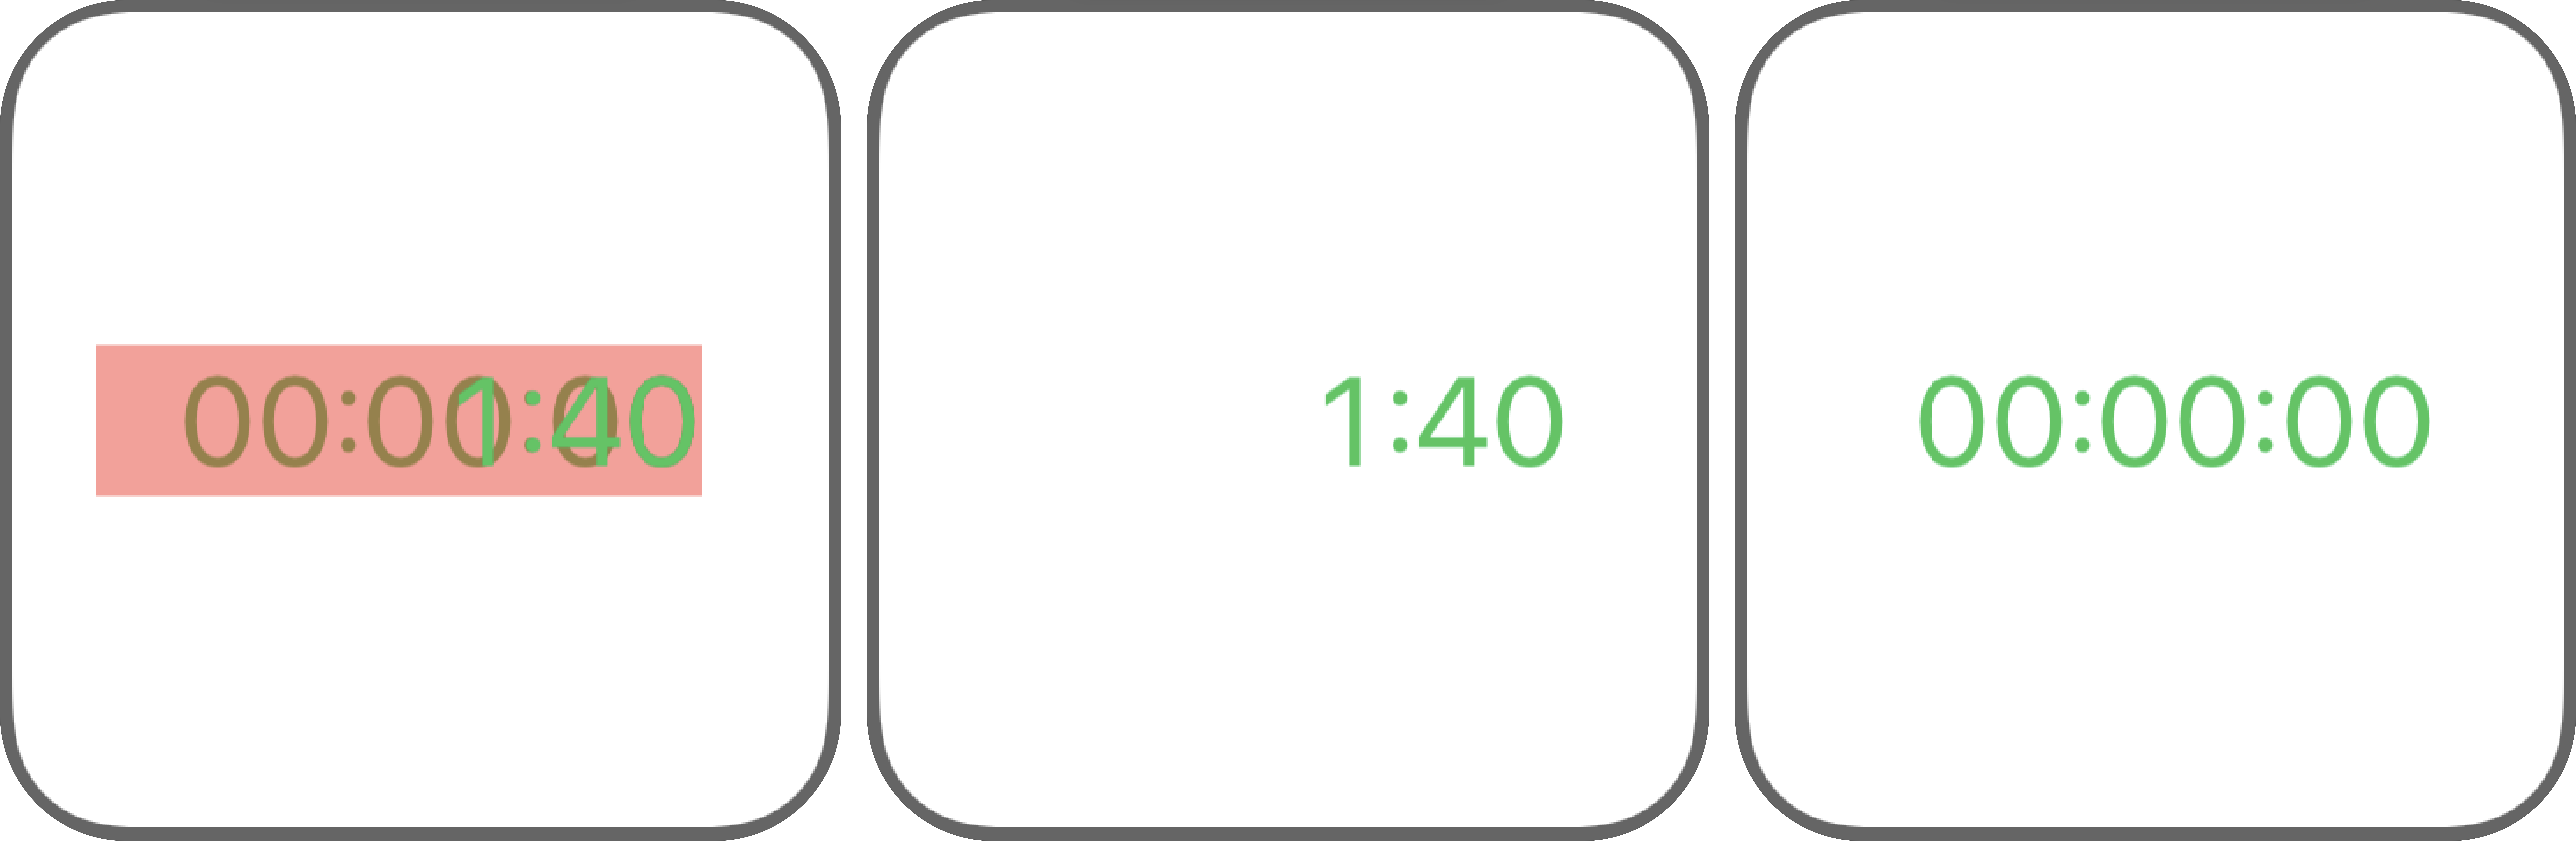
Well that’s not right.
In that first image, I’ve set the background of the live view to a transparent red. You can see that the alignment of the views is correct but the frame is different when running in the context of a widget.
It makes sense that the frame is different. To manage performance it’s safe to assume that iOS is splitting the view into static layers and just updating a known area. I assume that the frame is full width so that other content can be pre-rendered in the correct locations without needing any computation for updates.
It’s bad though.
If the frame is full width then any background fill will be too big. Without any other live content or updates I can’t manually calculate correct frames. This is a big blocker.
I kept playing and found that all live updates stopped functioning when manually
trying to build custom formatting on the string contents of the text view. Live
updates persist through aggregate text fields, ie: Text() + Text().
So I could do Text(prefix) + Text(pastDate, style: .timer) and end up with a
stable 00:0M:SS for the first 10 minutes.
At 10 minutes even, this would result in 00:0MM:SS (an extra zero in the minutes).
Adding a fixed prefix will break at:
- 10 min mark (‘00:0’ -> ‘00:’)
- 1 hour mark (‘00:’ -> ‘0’)
- 10 hour mark (‘0’ -> ‘’)
So let’s recap:
- It’s possible to build widgets with live timestamps using
Text(:, style) - Live timers do not start with leading 0s
- Custom formatting around live text fields breaks live updating
- Text views can be added together without breaking live updates
- The content of the prefix becomes invalid at 10 min, 1 hour and 10 hours
This is everything that we need.
Putting it all together
My final solution involves looking at the daily and weekly totals and calculating if the 10 min, 1 hour and 10 hour mark for each of those two counts lies in the future. I then schedule the timeline updates with different prefixes for the time value depending on how many leading zeros will be needed.
If you are at 6min for the week and start a new timer the weekly prefix becomes invalid in 4 minutes and the daily prefix becomes invalid in 10 minutes.
On top of this, I’ve scheduled intentional complete timeline refreshes at the start of each day (ex: midnight) to make sure that the widgets will zero out properly.
Going back to the earlier question of “how close are timeline updates to their scheduled time?” the answer is “close, but not perfect.”
When crossing the 10 minute mark there is a chance that the widget will display incorrectly for a very brief period of time. It doesn’t happen every time, but it may happen if you’re intentionally watching the values update on your home screen.
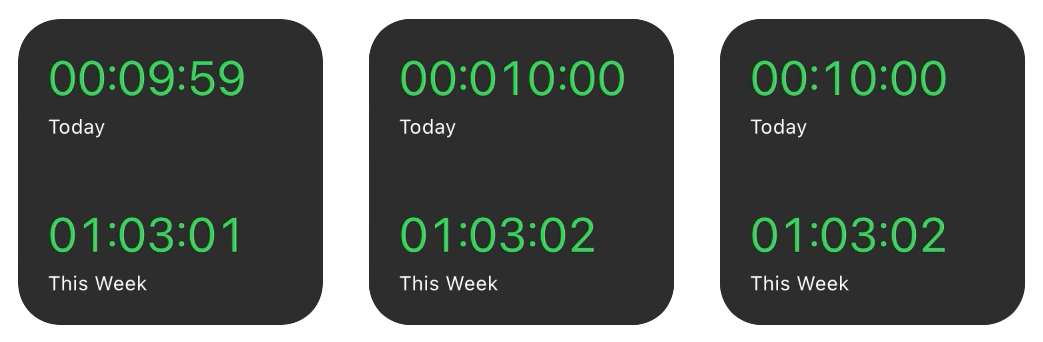
That’s a problem that I can live with. It resolves quickly, and in my main use case there is a very low chance that I’ll be staring at my home screen during the first 10 minutes of my work day.
So there we go! An iOS 14 widget that tells me if my timers are running and upates every second.

I’m very happy with how this solution all came together. It was a longer process than I expected, but it has been such a satisfying addition to my app. If you’d like to read even more, this is the PR where I introduced these changes to Time.
This post is the third in a series about my Time project.